
Mac 使用中的一些常用操作和命令。
隐藏 Dock Icon
隐藏程序在 Dock 上的 Icon,以隐藏 QQ 的 图标为例:
1 | defaults write /Applications/QQ.app/Contents/Info.plist LSUIElement 1 |
Vim 基础
下面列出一些 Vi 常用的命令和设置:
- 搜索高亮:
:set hlsearch - 显示行号:
:set number - 可使用鼠标点击:
:set mouse=a - 搜索:
/+keyword - 大小写不敏感搜索:
/+keyword\c:set ic,然后/+keyword
- 删除当前行:
dd - 删除光标后的字符:
x - 复制当前行:
yy - 粘贴复制的行:
p - 回到第一行:
gg - 跳到最后行:
GG - 回到行首:
0 - 跳到行尾:
$ - 光标处插入:
i - 光标后插入:
a - 插入新一行:
o - 撤销操作:
u - 光标移到屏幕顶部:
H - 光标移到屏幕中部:
M - 光标移到屏幕底部:
L - 单词出现的次数:
:%s/pattern//gn - 上一页:
ctrl+b - 下一页:
ctrl+f
Vi 内全局替换
1 | # 使用 str2 替换 str1 |
如果要长期有效,可以在 ~/.vimrc 里加上对应的设置,例如
1 | set hlsearch |
Sed 搜索替换
1 | Linux: sed -i "s/6380/7000/g" redis-6380.conf |
Mac 下 sed 只能输出,不支持 -i 进行文件内替换,可以使用重定向符号输出到其他文件。
Bat
Bat 是语法高亮的 cat (Clone of cat with syntax highlighting and Git integration), 主页为 https://github.com/sharkdp/bat,可以使用 brew 安装: brew install bat,可以在 .bash_profile 里给其设置别名为 cat 用于替代 cat: alias cat="bat":
查看端口占用
使用 lsof -i:port 查看端口是否被某个进程占用了,例如 lsof -i:8080。
查看使用端口的 PID
lsof -n -P | grep :80
使用文件名查找
find dir -name filename,例如 find . -name mvc.xml
使用文件大小查找
普通显示: find . -size +200M
显示大小: find . -size +100M 2>/dev/null -exec ls -lh {} \;
2>/dev/null不显示 Operation not permitted 的提示。
使用文件修改时间查找
find . -ctime -10s
查找后使用 grep
find . -name "*.java" | xargs grep -n --color "topic"
查找后打开文件
1 | find . -name mac-tips.md | xargs open |
统计多个文件的行数
1 | find . -name "*.java" | xargs wc -l |
awk 输出列
1 | // 输出第一列 |
sort & uniq
1 | // 按行排序,并去掉重复行 |
zip
1 | // 把文件夹 H5 和文件 x.html 压缩成 result.zip |
unzip
1 | // -d 指定输出目录 |
tar
1 | // 压缩为 archive.tar |
查看不同状态的链接数量
1 | netstat -n | awk '/^tcp/ {++state[$NF]} END {for(key in state) print key,"\t",state[key]}' |
转换文件编码
1 | // 单个文件转码 |
显示目录树
使用 brew 安装 tree:
brew install tree执行命令
tree就能显示当前目录的树形结构1
2
3
4
5
6
7
8
9
10
11
12
13
14
15.
├── LICENSE.txt
├── build.gradle
└── src
├── main
│ ├── java
│ ├── resources
│ └── webapp
│ └── WEB-INF
│ └── web.xml
└── test
├── java
└── resources
9 directories, 3 files
计算文件的 MD5
1 | md5 fileName |
计算字符串 MD5
1 | # 下面 3 种方式都可以 |
输出文件的十六进制
1 | hexdump -C Main.java | head -n 20 |
重新加载声卡驱动
合上盖子后再打开有时候可能会没声,注销再登陆后就有声音了,或者用命令重新加载声卡驱动也可以解决
1 | sudo kextunload /System/Library/Extensions/AppleHDA.kext |
递归创建目录
1 | # p 是 plus 之意 |
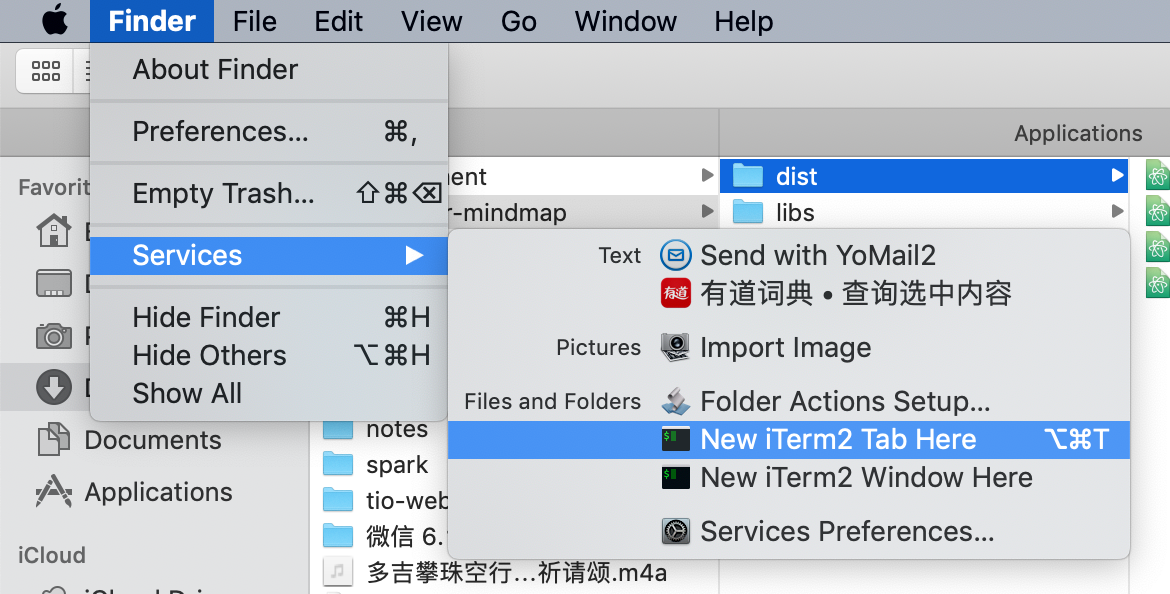
Go2Shell
Opens a terminal window to the current directory in Finder. 支持 iTerm2 和 Terminal.
可以在系统快捷键中设置 Finder 的 Finder->Services->New iTerm2 Tab Here 的快捷键为 ALT+CMD+T 按下快捷键打开.
Chrome 清除缓存插件
Chrome 应用商店里搜索 clear Cache,找到 clear Cache, clean cache, 清理缓存 并安装
查看文件夹大小
1 | du -sh |
cp 复制文件夹
1 | # 把文件夹 srcDir 复制到 destDir, srcDir 为 destDir 的子文件夹 |
scp 上传和下载文件
scp src dst:
- 上传文件:
scp /Users/Biao/Desktop/a.zip root@192.168.82.130:/root - 下载文件:
scp root@192.168.82.130:/root/a.zip /Users/Biao/Desktop - 指定端口使用 -P port:
scp -P 29443 root@192.168.82.130:/root/a.zip .
mv 移动目录
1 | # 移动目录和重命名都是使用命令 mv,区别就是后面的 / |
Quick Look plugins
Monterey 中可用的 Quicklook 插件:
- 语法高亮: Syntax Highlight
- 文本预览: QLStephen
- MD 预览: QLMarkdown
注意: Monterey 中安装完后需要手动赋予磁盘访问权限。
可以使用 brew cask 安装 Quick Look 插件,具体请参考 https://github.com/sindresorhus/quick-look-plugins。
1 | brew install --cask qlcolorcode qlstephen qlmarkdown quicklook-json qlimagesize webpquicklook suspicious-package quicklookase qlvideo |
目前 Monterey 中不能使用 brew 安装 qlcolorcode,使用下面的步骤进行安装:
- 下载 QLColorCode 4.1.2 解压到目录 ~/Library/QuickLook
- 赋予磁盘访问权限: 在系统设置 -> 安全 -> 隐私 -> Full Disk Access 中添加 QLColorCode 中的 Contents/MacOS/QLColorCode 和 /Contents/Resources/highlight
- 执行
qlmanage -r,qlmanage -r cache,killall Finder- 找个 js 文件按下空格进行预览
- 如果还不行,终端执行 qlmanage -p xxx.js 使用 Debug 模式预览试试
- 有的时候要反复多试几次 3 到 5 最后才生效
使用 QLColorCode 预览指定格式的文件,如 .sh, .bat, .properties:
- 安装 QLColorCode:
brew cask install qlcolorcode - 获取 UTI:
mdls -name kMDItemContentType application.properties,输出:
kMDItemContentType = “dyn.ah62d4rv4ge81a6xtsbw1e7dmqz3u” - 打开 ~/Library/QuickLook/QLColorCode.qlgenerator/Contents/Info.plist,找到节点 Document Types > Item0 > Document Content Type UTIs,
把上面得到的 dyn.ah62d4rv4ge81a6xtsbw1e7dmqz3u 加入到这个节点下,保存 - 执行
qlmanage -r,然后就可以使用 QLColorCode 预览 .properties 的文件了
预览其他格式参考上面的步骤即可。
查看 QuickLook 插件预览的文件关系,执行
qlmanage -m,输出中有对应的关系。
列出 Node 安装的软件
1 | ls $(npm root -g) |
Node 使用淘宝镜像
使用淘宝 NPM 镜像,安装时使用 cnpm 代替 npm:
1 | npm install -g cnpm --registry=https://registry.npm.taobao.org |
删除所有 Vmware 的进程
1 | kill -9 $(ps aux | grep -i vmware | grep -v grep | awk '{print $2}') |
去掉截图阴影
1 | defaults write com.apple.screencapture disable-shadow -bool true ; killall SystemUIServer |
修改截图名称
1 | defaults write com.apple.screencapture name "shot" |
更新文件图标
1 | sudo rm -rfv /Library/Caches/com.apple.iconservices.store; sudo find /private/var/folders/ \( -name com.apple.dock.iconcache -or -name com.apple.iconservices \) -exec rm -rfv {} \; ; sleep 3;sudo touch /Applications/* ; killall Dock; killall Finder |
隐藏显示文件
1 | alias hide="chflags hidden *" |
显示后台进程
使用 jobs -l 查看当前终端(标签页)启动的后台进程。关闭终端后,在另一个终端 jobs 无法看到后台跑得程序了,此时可利用 ps 命令。
终端不显示上次登录时间
If you don’t want to see that login message or MOTD again, you can get rid of that ‘Last login’ message at the top of a new terminal by entering the following command to create a ‘hushlogin’ file:
1 | touch /Users/$(whoami)/.hushlogin |
终端不显示邮件提示
终端打开标签页有时会提示有新邮件,一般都是由于 crontab 任务导致的,如果不想看到,删除文件 /var/mail/$(whoami) 即可。
远程执行命令
1 | # 如果没有用 ssl,则需要输入密码 |
终端预览 Markdown 文件
使用 Glow 在终端预览 Markdown 文件。执行 glow 会递归列出执行命令所在目录下的所有 Markdown 文件,执行 glow xx.md 预览指定的 Markdown 文件。
Use it to discover markdown files, read documentation directly on the command line and stash markdown files to your own private collection so you can read them anywhere. Glow will find local markdown files in subdirectories or a local Git repository.
1 | Glow will find local markdown files in the current directory and below |
避免 ssh 断开
当 ssh 连接一会不操作后会自动断开,在 ~/.ssh/config 中增加下面的内容可以避免自动断开:
1 | Host * |
Zsh 配置 .zshrc
1 | export GRADLE_HOME="/usr/local/gradle" |