Content Table

Vue 中使用 TinyMCE

TinyMCE 是一个功能强大的富文本编辑器:

  • 支持从 Word 中复制的文本格式
  • 拖拽修改图片的大小
  • 表格拖拽修改单元格大小
  • 提供了三种编辑模式
    • Full featured: 默认显示工具栏
    • Inline: 编辑器的到焦点时才显示工具栏
    • Distraction Free: 选中文本后才显示工具栏
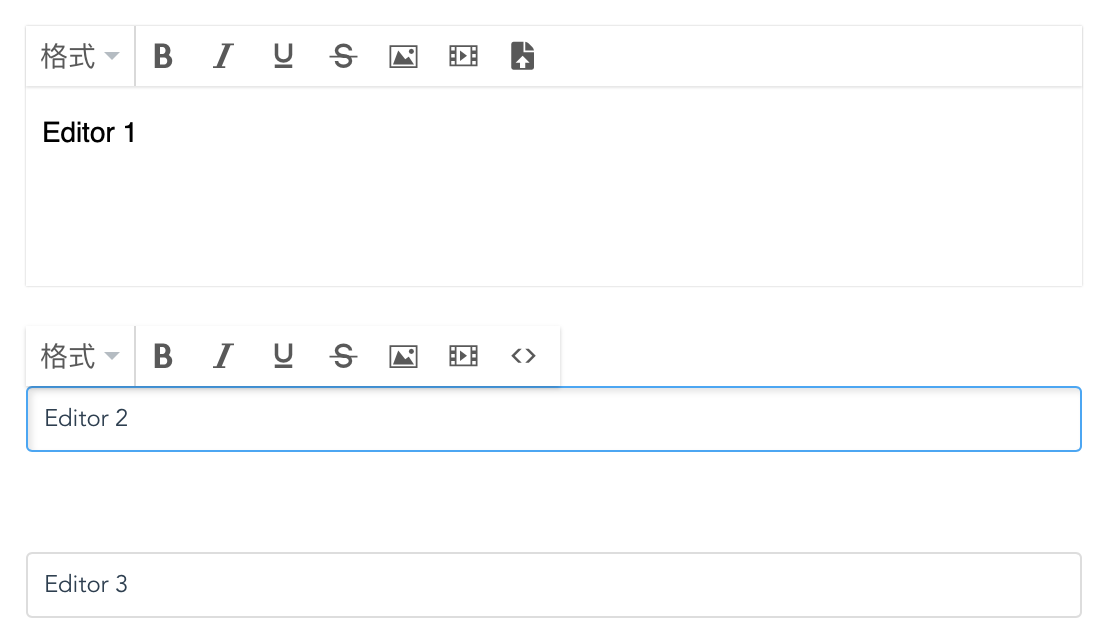
  • 同一页面中可以创建多个编辑器
  • 界面美观简洁, 使用 CSS 修改样式很方便, 工具栏按钮使用 SVG 图片
  • 插件开发简单, 甚至不需要开发插件就能向工具栏插入按钮

TinyMCE 提供了 cloud 版本, 也可以下载到本地使用.

使用 TinyMCE 只需要 3 步:

  1. 引入 TinyMCE
  2. 为 TinyMCE 准备一个 DOM
  3. 基于准备好的 DOM,初始化 TinyMCE 实例

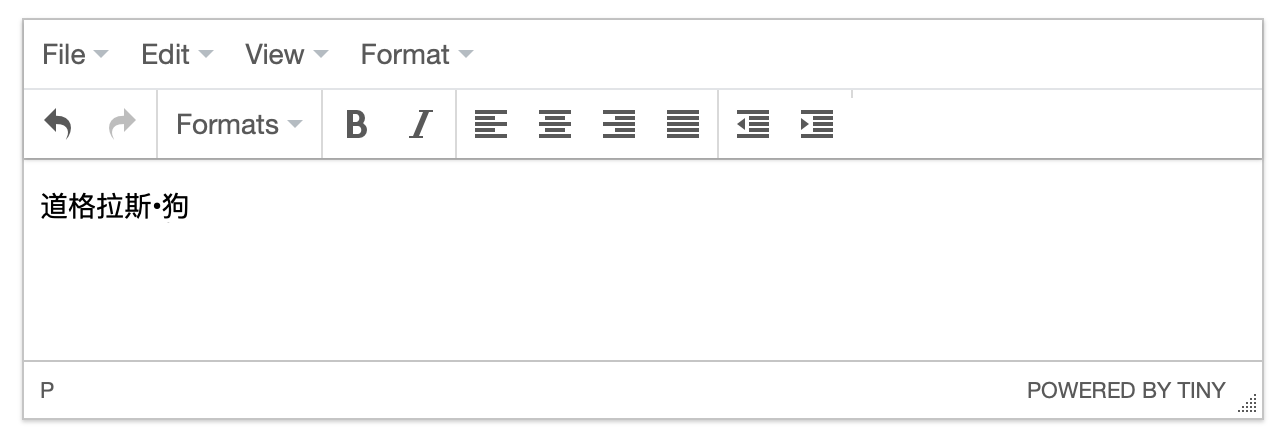
下图是使用默认参数创建的 TinyMCE 编辑器:

代码如下:

1
2
3
4
5
6
7
8
9
10
11
12
13
14
15
16
17
18
19
20
21
<!DOCTYPE html>
<html>

<head>
<meta charset="utf-8">
<title>TinyMCE</title>
<!-- [1] 引入 TinyMCE -->
<script src="tinymce/tinymce.min.js"></script>
</head>

<body>
<!-- [2] 为 TinyMCE 准备一个 DOM -->
<div id="editor">道格拉斯•狗</div>

<script>
// [3] 基于准备好的 DOM,初始化 TinyMCE 实例
tinymce.init({ selector: '#editor' });
</script>
</body>

</html>

官方提供了非常丰富的文档, 请访问 https://www.tiny.cloud/docs 进行阅读, 了解 TinyMCE 更多的使用方法.

获取和修改编辑器内容

获取编辑器中的内容调用函数: getContent()

向编辑器内插入内容调用函数: insertContent()

设置编辑器的内容: setContent()

1
2
3
4
5
6
7
8
tinymce.init({
selector: '#editor',
}).then(editors => {
// 创建成功的时候保存编辑器的对象 (参数是编辑器数组, 因为 selector 可以使用 class 选择器一次生成多个编辑器)
var editor = editors[0];
editor.insertContent('<b>Alice</b>');
console.log(editor.getContent());
});

Inline 编辑模式

实现 Inline 编辑模式只需要设置 inline 为 true 即可:

1
2
3
4
tinymce.init({
selector: '#editor',
inline: true,
});

Distraction Free 编辑模式

实现 Distraction Free 编辑模式需要修改 inline, theme 两个属性, 此模式下的工具栏配置使用 selection_toolbar:

1
2
3
4
5
6
tinymce.init({
selector: '#editor',
inline: true,
theme: 'inlite',
selection_toolbar: 'bold italic underline strikethrough',
});

更换语言

默认是英文的, 使用中文需要下载中文语言包, 然后设置 language 为 zh_CN:

  • 下载中文语言包: 访问语言包下载页, 选择 Chinese (China) 然后点击下载

  • 复制下载得到的 zh_CN.js 到 TinyMCE 的 langs 目录

  • 创建编辑器时设置 language 为 zh_CN:

    1
    2
    3
    4
    tinymce.init({
    selector: '#editor',
    language: 'zh_CN',
    });

菜单和工具栏

Full featured 和 Inline 编辑模式下定制工具栏设置属性 toolbar (字符串格式, 每一个工具栏按钮就是一个插件, 插件之间使用空格分隔):

1
2
3
4
tinymce.init({
selector: '#editor',
toolbar: 'styleselect | bold italic underline strikethrough',
});

移除菜单栏设置 menubar 为 false 即可:

1
2
3
4
5
tinymce.init({
selector: '#editor',
menubar: false,
toolbar: 'styleselect | bold italic underline strikethrough',
});

想了解具体有哪些插件可用, 请访问 Add Plugins to TinyMCE 进行查看,也可参考 TinyMCE 工具栏配置详解.

插件开发

Create a Plugin 中介绍了怎么开发插件, 这里介绍另一种简单直接的方式在 setup() 函数中向工具栏插入一个按钮:

1
2
3
4
5
6
7
8
9
10
11
12
13
14
tinymce.init({
selector: '#editor',
toolbar : 'fitb', // [2] 使用按钮 fitb
setup: function(editor) {
// [1] 创建填空按钮 fitb
editor.addButton('fitb', {
icon : 'code',
title : '插入填空',
onclick: () => {
editor.insertContent('<abbr class="fitb"> (________) </abbr>');
}
});
}
});

说明:

  • addButton() 的第一个参数为插件的名字, 配置工具栏 toolbar 时使用

  • icon 为按钮的图标名字, 此按钮的 class 为 mce-ico mce-i-code (按钮的名字紧跟 mce-i- 后面)

    也许你会问: 怎么知道图标的名字是什么呢?

    TinyMCE 的主题使用的 SVG 图标文件在 skins/lightgray/fonts/tinymce.svg, 把它拖拽到 http://jsfiddle.net/iegik/r4ckgdc0 中就会显示出所有图标和图标的名字, 选择合适的图标使用:

    如果没有合适的图标可用, 可以修改 TinyMCE 提供的图标字体文件, 也可以根据生成的按钮的 class, 使用 CSS 修改按钮的样式.

  • title 为鼠标移动到按钮上的提示信息

  • 点击按钮后执行 onclick() 函数

监听编辑器内容变化

使用下面的代码监听编辑器的内容变化:

1
2
3
4
5
6
7
8
9
tinymce.init({
selector: '#editor',
setup: function(editor) {
// 编辑器内容发生变化后被调用
editor.on('change keyup', () => {
console.log(editor.getContent());
});
}
});

到此 TinyMCE 的使用已经介绍的差不多了, 接下来就介绍 Vue 中使用 TinyMCE.

销毁编辑器

当创建的 TinyMCE 编辑器对象不再需要时把它们给销毁掉, 有 2 种方法进行销毁:

  • tinymce.remove('#editorId')
  • editor.remove() (创建成功时保存的 editor 对象)

Vue 中使用 TinyMCE

下面介绍使用 Vue 把 TinyMCE 封装为编辑器组件 RichText, 使用 v-model 自动获取编辑的内容, 编辑器的 DOM 和 id 自动生成, RichText 在生命周期结束的时候自动销毁 TinyMCE 释放内存:

  1. 在页面的入口页面中引入 TinyMCE:

    1
    2
    3
    4
    5
    6
    7
    8
    9
    10
    11
    12
    13
    14
    15
    16
    17
    18
    <!DOCTYPE html>
    <html lang="en">

    <head>
    <meta charset="utf-8">
    <title>Foo</title>
    </head>

    <body>
    <div id="app"></div>

    <!-- 引入 TinyMCE -->
    <script src="/static/tinymce/tinymce.min.js"></script>

    <!-- built files will be auto injected -->
    </body>

    </html>
  2. 封装 TinyMCE 为组件 RichText, 保存为 src/components/RichText.vue:

    1
    2
    3
    4
    5
    6
    7
    8
    9
    10
    11
    12
    13
    14
    15
    16
    17
    18
    19
    20
    21
    22
    23
    24
    25
    26
    27
    28
    29
    30
    31
    32
    33
    34
    35
    36
    37
    38
    39
    40
    41
    42
    43
    44
    45
    46
    47
    48
    49
    50
    51
    52
    53
    54
    55
    56
    57
    58
    59
    60
    61
    62
    <template>
    <div class="rich-text">
    <div :id="editorId"></div>
    </div>
    </template>

    <script>
    export default {
    props: {
    html: { type: String, default: '<p></p>' }, // HTML 内容
    },
    model: {
    prop : 'html',
    event: 'text-changed' // 编辑器的内容发生变化后触发, 参数为编辑的 HTML
    },
    data() {
    return {
    editor: null,
    };
    },
    mounted() {
    const self = this;

    tinymce.init({
    selector: `#${this.editorId}`,
    setup: function(editor) {
    // 编辑器内容发生变化后更新 html 的内容
    editor.on('change keyup', () => {
    self.$emit('text-changed', editor.getContent());
    });
    }
    }).then(editors => {
    this.editor = editors[0];
    this.editor.setContent(this.html);
    });
    },
    computed: {
    // 使用时间戳和随机数生成 editorId
    editorId() {
    const time = new Date().getTime();
    const rand = Math.floor(Math.random() * 100000000);
    return `editor-${time}-${rand}`;
    },
    },
    beforeDestroy() {
    // 销毁编辑器
    this.editor.remove();
    },
    watch: {
    // 外部修改 v-model 绑定的 html 的值时更新编辑器的内容
    html(newValue, oldValue) {
    if (newValue != this.editor.getContent()) {
    this.editor.setContent(newValue || '<p></p>');
    }
    }
    },
    };
    </script>

    <style lang="scss">

    </style>

    watch.html() 在每次编辑后都会被触发调用, 是为了实现当绑定的 html 被外部修改时自动更新编辑器的内容, 但是 html 被外部修改的场景估计很少 (本来目的就是要用 RichText 来编辑), 当编辑器中的内容很长时, 比较字符串的效率不高, 所以实际项目中可以考虑删除 watch.html() 以提高效率, 外部真需要修改 html 的时候使用 ref 的方式直接调用 this.$refs.richText.editor.setContent() 就可以了.

  3. 使用插件 RichText:

    1
    2
    3
    4
    5
    6
    7
    8
    9
    10
    11
    12
    13
    14
    15
    16
    17
    18
    19
    20
    21
    22
    23
    <template>
    <div class="editor-demo">
    <RichText v-model="html" />
    <div v-html="html"></div>
    </div>
    </template>

    <script>
    import RichText from '@/components/RichText';

    export default {
    components: { RichText },
    data() {
    return {
    html: '封装 TinyMCE 为组件 RichText',
    };
    }
    };
    </script>

    <style lang="scss">

    </style>

    编辑的时候, 变量 html 的值自动更新了, 不需要使用 editor.getContent() 进行获取,.

    可能会在很多页面中都会使用到 RichText, 可以在 main.js 中全局注册 RichText, 其他页面和组件中不用再次注册就可以直接使用了:

    1
    2
    import RichText from '@/components/RichText';
    Vue.component('RichText', RichText);

实际项目中的 RichText

了解怎么封装 TinyMCE 为组件后, 实际开发中还需要根据业务和设计进一步进行定制, 最后附上一个实际项目中的 RichText 组件作为参考:

1
2
3
4
5
6
7
8
9
10
11
12
13
14
15
16
17
18
19
20
21
22
23
24
25
26
27
28
29
30
31
32
33
34
35
36
37
38
39
40
41
42
43
44
45
46
47
48
49
50
51
52
53
54
55
56
57
58
59
60
61
62
63
64
65
66
67
68
69
70
71
72
73
74
75
76
77
78
79
80
81
82
83
84
85
86
87
88
89
90
91
92
93
94
95
96
97
98
99
100
101
102
103
104
105
106
107
108
109
110
111
112
113
114
115
116
117
118
119
120
121
122
123
124
125
126
127
128
129
130
131
132
133
134
135
136
137
138
139
140
141
142
143
144
145
146
147
148
149
150
151
152
153
154
155
156
157
158
159
160
161
162
163
164
165
166
167
168
169
170
171
172
173
174
175
176
177
178
179
<template>
<div class="rich-text">
<div :id="editorId"></div>
</div>
</template>

<script>
export default {
props: {
inline : { type: Boolean, default: false }, // 是否 inline 模式
html : { type: String, default: '<p></p>' }, // HTML 内容
minHeight: { type: Number, default: 101 }, // 最小高度
toolbar : { type: Number, default: 0, validator(value) { return value >= 0 && value <= 1; } }, // 工具栏的下标: 0 或 1
},
model: {
prop : 'html',
event: 'text-changed' // 编辑器的内容发生变化后触发, 参数为编辑的 HTML
},
data() {
return {
editor : null,
toolbars : [],
baseToolbar: 'styleselect | bold italic underline strikethrough',
uploadMode : 0,
};
},
mounted() {
// 创建各种场景使用的 toolbar
const toolbar1 = `${this.baseToolbar} image media attachment`; // 普通场景使用
const toolbar2 = `${this.baseToolbar} image media fitb`; // 编辑题目使用
this.toolbars = [toolbar1, toolbar2];

this.initEditor();
},
methods: {
// 创建编辑器
initEditor() {
const self = this;

tinymce.init({
selector : `#${this.editorId}`,
inline : this.inline,
min_height : this.minHeight,
toolbar : this.toolbars[this.toolbar],
language : 'zh_CN',
branding : false,
elementpath : false,
statusbar : false,
relative_urls: false, // 不把绝对路径转换为相对路径
menubar : false,
setup: function(editor) {
// 创建工具栏按钮
self.addToolbarButtons(editor);

// 编辑器内容发生变化后更新 html 的内容
editor.on('change keyup', () => {
self.$emit('text-changed', editor.getContent());
});
}
}).then(editors => {
this.editor = editors[0];
this.editor.setContent(this.html);

// inline 时的最小高度
if (self.inline && self.minHeight !== 101) {
document.getElementById(self.editorId + '').style.minHeight = self.minHeight + 'px';
}
});
},

// 创建工具栏按钮
addToolbarButtons(editor) {
// 添加填空按钮
editor.addButton('fitb', { icon: 'code', title: '插入填空', onclick: () => {
editor.insertContent('<abbr class="fitb"> (________) </abbr>');
} });

// 添加上传图片按钮
editor.addButton('image', { icon: 'image', title: '插入图片', onclick: () => {
this.uploadMode = 0;
// show uploader
} });

// 添加上传 MP3, MP4 按钮
editor.addButton('media', { icon: 'media', title: '插入 MP3 或 MP4', onclick: () => {
this.uploadMode = 1;
// show uploader
} });

// 添加上传附件按钮
editor.addButton('attachment', { icon: 'upload', title: '上传附件', onclick: () => {
this.uploadMode = 2;
// show uploader
} });
},
},
computed: {
// 使用时间戳和随机数生成 editorId
editorId() {
const time = new Date().getTime();
const rand = Math.floor(Math.random() * 100000000);
return `editor-${time}-${rand}`;
},
},
beforeDestroy() {
// 销毁编辑器
this.editor.remove();
},
watch: {
// 外部修改 v-model 绑定的 html 的值时更新编辑器的内容
html(newValue, oldValue) {
if (newValue != this.editor.getContent()) {
this.editor.setContent(newValue || '<p></p>');
}
}
},
};
</script>

<style lang="scss">
.rich-text {
// 微调 Full featured 的编辑器阴影, 工具栏阴影
.mce-tinymce {
box-shadow: 0 0px 1px rgba(0, 0, 0, 0.25);

.mce-top-part::before {
box-shadow: 0 1px 1px rgba(0, 0, 0, 0.1);
}
}

// inline 模式的边框和得到焦点的样式
.mce-content-body {
padding: 8px;
border: 1px solid #DDD;
border-radius: 3px;

&.mce-edit-focus {
outline: none;
border-color: #47a4f5;
box-shadow: 2px 2px 3px rgba(0, 0, 0, 0.1) inset;
}
}

.mce-notification {
display: none;
}
}

// 工具栏样式: 缩小字体, 修改按钮的 hover 背景色等
.mce-panel {
border: none !important;

.mce-toolbar .mce-btn-group {
padding: 0;

&:not(:first-child) {
margin-left: 0;
}

.mce-btn {
margin-left: 0;

&:hover {
border-color: transparent;
background: #808695;
color: white;

.mce-ico, button {
color: white;
}
}

.mce-ico {
font-size: 14px;
}
}
}
}
</style>
1
2
3
4
5
6
7
8
9
10
11
12
13
14
15
16
17
18
19
20
21
22
23
24
25
26
27
28
29
30
31
32
33
34
<template>
<div class="editor-2">
<RichText v-model="html1" />
<RichText v-model="html2" :toolbar="1" inline />
<RichText v-model="html3" inline />

<div>{{ html1 }}</div>
<div>{{ html2 }}</div>
<div>{{ html3 }}</div>
</div>
</template>

<script>
import RichText from '@/components/RichText';

export default {
components: { RichText },
data() {
return {
html1: 'Editor 1',
html2: 'Editor 2',
html3: 'Editor 3',
};
},
};
</script>

<style lang="scss">
.editor-2 {
.rich-text {
margin-bottom: 50px;
}
}
</style>

项目中根据不同的场景提供不同的工具栏, 而且一个项目里的编辑场景基本也是固定的几种, 所以上面的实现提供了几种固定的工具栏以供选择, 使用的时候传入工具栏下标参数指定即可. 新添加的工具栏按钮也比较固定, 为了方便也是直接在 setup() 中创建, 省得去使用标准的插件开发方式创建, 然后在 plugins 中引入. 编辑器使用的 DOM 的 id 使用时间戳加随机数生成, 保证了每次使用 RichText 时都会生成唯一的 id, 省去了手动指定 id 的麻烦.